All You Need to Know About The Secrets to Make African Violets Bloom Abundantly

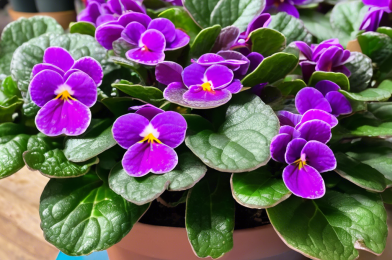
Are you longing for a burst of vibrant color and a touch of charm in your indoor garden? Look no further than the captivating African Violet (Saintpaulia), a beloved houseplant for generations. With their lush foliage and dainty blooms, these beauties can grace your home with a profusion of flowers throughout the year. But to unlock their full potential, you need more than just a green thumb. Get ready to discover the secrets behind making your African Violets flourish and dazzle like never before!

**Sunlight: The Elixir of Life for African Violets**

African Violets are sun worshippers, but they prefer their rays in a gentle, indirect fashion. Place your plants near windows that receive bright, filtered light. East- or north-facing windows are often ideal, as they provide the perfect balance of illumination without the harsh intensity of direct sunlight, which can scorch the delicate leaves. If natural light is scarce, consider using grow lights. These artificial illuminators can mimic the sun’s magic, providing the necessary light spectrum for your African Violets to thrive.

**Watering Wisdom: The Art of Hydration**

The key to happy, blooming African Violets lies in mastering the watering technique. These plants are finicky drinkers, preferring their roots to stay moist but never soggy. The crown of the plant, where new leaves emerge, should remain dry to prevent rot. Water your violets with room-temperature water, and aim to keep the soil consistently moist. A popular method is the ‘wicking’ technique, where a cotton or nylon rope is used to draw water up into the soil from a reservoir below. This ensures the plant gets the right amount of water without overwatering.

**Nurturing with Nutrients: The Fuel for Flowers**

African Violets need a steady diet of nutrients to support their blooming prowess. Use a balanced, water-soluble fertilizer designed for blooming plants, and feed your violets every two weeks during the growing season. A diluted fertilizer solution, applied gently to the soil, will provide the necessary nutrients without burning the roots. Remember, less is more. Over-fertilizing can lead to excessive foliage growth at the expense of flowers.

Stay tuned for the next sections, where we’ll explore the perfect soil mix, ideal humidity and temperature conditions, and the magic touch of repotting for your African Violet’s blooming success!

How to Turn Plastic Bottles Into a DIY Rotating Irrigation System

Creating a rotating irrigation system from plastic bottles is an innovative and eco-friendly way to water your garden, especially for those with limited access to water or those looking for sustainable solutions. This DIY project is not only budget-friendly but also helps reduce plastic waste, making it an excellent upcycling endeavor. With just a few simple materials and some creativity, you can build a nifty irrigation system for your plants.

The main component of this project is used plastic bottles. Collect a good number of empty plastic bottles, preferably 2-liter or larger. These will form the basis of your irrigation system. The idea is to use the bottles to create a rotating mechanism that dispenses water slowly, providing a constant supply of moisture to your plants.

To start, you’ll need to prepare the bottles. Remove any labels and clean them thoroughly to ensure no residue is left behind. Then, using a sharp knife or a pair of scissors, cut the bottom of each bottle. This will allow you to fill the bottles with water and also provide a place for the water to drip out. The size of the hole can vary depending on the flow rate you want to achieve. Experiment with different sizes to find the perfect fit for your plants’ needs.

Next, you’ll need to create the rotating mechanism. For this, you can use a simple lazy Susan or a turntable designed for displaying cakes or other items. Attach the bottles to the turntable, spacing them evenly around the edge. The bottles should be positioned so that the cut ends face the center of the turntable, allowing water to drip onto the rotating platform.

Fill each bottle with water and then place your plants or pots on the turntable. As the turntable rotates, the water from the bottles will drip out, providing a consistent water supply to your plants. The rotation ensures that water is evenly distributed, catering to each plant’s needs.

This DIY rotating irrigation system is a great way to save time on watering, especially if you have a busy schedule. It’s also an excellent project to involve kids, teaching them about recycling and sustainable practices in gardening.

A Step-by-Step Guide to Pruning Rose Bushes: When and How to Do It Right

Roses are a beloved addition to any garden, but to keep them thriving and blooming to their fullest potential, proper care and maintenance are essential. One crucial aspect of rose care that can often be overlooked is pruning. Pruning rose bushes is an art that, when done correctly, can promote healthy growth, improve air circulation, and encourage a vibrant display of flowers. Let’s delve into a comprehensive guide on when and how to prune your rose bushes for optimal results.

**Timing is Key**
The secret to successful rose pruning lies in understanding the ideal timing. Late winter or early spring, just before new growth begins, is generally the best time to prune. During this period, the risk of severe cold damage is reduced, and your roses are getting ready for the upcoming growing season. However, the exact timing may vary depending on your climate and the type of roses you have. For instance, old garden roses and once-blooming antique varieties should be pruned immediately after they finish blooming to avoid removing potential flower buds.

**Step-by-Step Pruning Process**
1. Start with clean, sharp pruning shears to minimize damage to the canes and prevent the spread of diseases.
2. Remove any dead or diseased wood, cutting it back to healthy tissue. Identify dead canes by their dark brown or black color and brittle texture.
3. Thin out the bush by cutting out old, weak, or crossing canes. Aim to create an open, vase-like shape to enhance air circulation and sunlight penetration.
4. Cut back the remaining canes by about one-third to one-half of their height, making the cuts at a 45-degree angle just above an outward-facing bud. This will stimulate new growth in the desired direction.
5. For climbing roses, train the canes horizontally to encourage flowering laterals to grow along the length of the cane.

Pruning may seem intimidating, but it becomes more comfortable with practice. Remember, roses are resilient, and even if you make a mistake, they will often bounce back.

**Aftercare**
After pruning, it’s essential to provide your roses with proper care. Water them well and consider applying a balanced fertilizer to promote healthy growth. Regularly monitor your rose bushes throughout the growing season, and don’t be afraid to lightly prune to maintain shape and remove any dead or diseased wood.

Pruning your rose bushes is an essential task for any rose gardener, ensuring your roses remain healthy and vibrant. With the right timing, techniques, and aftercare, your roses will reward you with a stunning display of flowers, season after season. Happy pruning!

How to Transform Banana Peels into Powerful Homemade Fertilizer In Just 5 Steps

Creating nutrient-rich fertilizer from banana peels is a simple and sustainable practice that not only benefits your garden but also reduces kitchen waste. With a few easy steps, you can transform this often-discarded part of the fruit into a powerful growth booster for your plants. Here’s how to unlock the hidden potential of banana peels and turn them into an effective homemade fertilizer:

1. Collect and Prepare the Peels: Start by saving the peels from the bananas you eat. Ensure you only use organic bananas to avoid any potential chemical residues. Give the peels a quick rinse to remove any dirt or contaminants, especially if you plan to use a blender for the next step.

2. Mash or Blend: Next, you have two options. You can either finely chop the peels and let them decompose naturally over time, or speed up the process by blending them into a smooth paste. Using a blender is an excellent choice if you want a more immediate fertilizer. Simply add a bit of water to the peels and blend until you achieve a consistent texture.

3. Add a Natural Sweetener (Optional): To accelerate the fermentation process and enhance the nutrient content, consider adding a natural sweetener like molasses or maple syrup. Microorganisms love these sugars, which promote faster decomposition. Mix about a tablespoon of your chosen sweetener into the blended peel mixture.

4. Fermentation: Place the mashed or blended banana peels in a container with a lid, ensuring there’s enough space for expansion during fermentation. The fermentation process will break down the peels, making the nutrients more readily available for your plants. Keep the container in a cool, dark place for at least a week. You’ll notice the mixture start to bubble and develop a distinct aroma, which is a sign that fermentation is taking place.

5. Application: Once the fermentation process is complete, your homemade fertilizer is ready to use. Dilute the mixture with water at a ratio of 1:5 (fertilizer to water). Apply this liquid fertilizer to your garden, pouring it around the base of plants. The soil will slowly absorb the nutrient-rich solution, providing a natural and potent boost to your vegetation.

This DIY banana peel fertilizer is an excellent way to promote healthy plant growth, especially for fruit and vegetable gardens. The peels are rich in potassium, phosphorous, calcium, and various micronutrients, which are essential for robust root development and vibrant blooms. By reusing what would otherwise be discarded, you’re not only saving money on store-bought fertilizers but also contributing to a more sustainable and eco-friendly gardening practice.

Remember, organic waste from your kitchen can be a goldmine for your garden, and with just a few simple steps, you can transform it into a powerful growth enhancer. So, don’t toss those banana peels; instead, let them work their magic in your garden!

The Full Guide to Cutting and Planting Potatoes for a Bigger, Healthier Harvest

Sure, get ready to dig into the fascinating world of potato cultivation! Growing your own potatoes can be a rewarding and delicious endeavor, and with the right techniques, you can achieve a bountiful harvest. Let’s explore the step-by-step process of cutting and planting potatoes to ensure a successful and healthy crop.

**Choosing the Right Potato Varieties:**
When it comes to planting potatoes, variety is key. Different types of potatoes thrive in specific growing conditions. For a successful harvest, select seed potatoes suitable for your region’s climate. Early-season varieties are great for regions with shorter growing seasons, while late-season varieties are ideal for areas with longer summers. Popular choices include Russet, Yukon Gold, and Red potatoes, each with its unique flavor and texture. Potatoes come in a myriad of varieties, so choose the ones that best suit your culinary preferences and local environment.

**Preparing the Potatoes for Planting:**
Before planting, it’s essential to prepare your seed potatoes. Opt for certified disease-free seed potatoes to ensure a healthy start. Let the potatoes develop firm skins by leaving them in a cool, bright area for about two weeks. This process, known as sprouting or ‘chitting,’ encourages the growth of strong sprouts. When the sprouts reach 1/2 to 1 inch, they’re ready for planting. Cutting larger seed potatoes into smaller pieces, each with a few sprouts, can increase your yield, but ensure each piece has a sufficient number of sprouts.

**Planting Potatoes:**
Now it’s time to get your hands dirty! Plant your potatoes in well-drained, loose soil. Create trenches or individual holes with a depth of 4-6 inches. Place each seed piece, sprout side up, into the prepared hole and cover it with soil. Space plants about 1 foot apart in rows set 2-3 feet apart. Adequate spacing is crucial for healthy growth and easy harvesting. Once planted, water your potatoes regularly, keeping the soil moist but not soggy.

**Caring for Your Potato Plants:**
As your potato plants grow, they require consistent care. Regular watering is essential, especially during dry spells. Aim to keep the soil evenly moist but not waterlogged. Consider using organic mulch to retain moisture and suppress weeds. Fertilizing is also beneficial, but be cautious not to overdo it, as excessive nitrogen can promote leafy growth at the expense of tuber development.

8 Powerful Natural Insecticides to Effectively Combat Your Stubborn Garden Pests

Are you tired of bugs munching on your prized garden vegetables or pests destroying your beautiful flowers? It’s time to fight back, and nature has provided us with an arsenal of powerful insecticides to help you win this battle. Say goodbye to those stubborn garden pests and hello to a thriving, healthy garden! Here are eight natural insecticides that will effectively keep those unwanted visitors at bay.

Neem oil, derived from the seeds of the neem tree, is a potent natural insecticide and a gardener’s best friend. It acts as a repellent, deterring a wide range of pests. Neem oil disrupts the hormonal balance in insects, preventing them from feeding and reproducing. This natural remedy is particularly effective against aphids, caterpillars, and mealybugs. Simply mix a few tablespoons of neem oil with water and a mild soap, pour into a spray bottle, and apply directly to your plants for protection and peace of mind.

Pyrethrin is a naturally occurring insecticide derived from the chrysanthemum flower. This powerful substance attacks the nervous system of insects, quickly incapacitating and eliminating them. Pyrethrin is especially useful for dealing with flying pests like mosquitoes and flies. It can also be effective against ants, beetles, and wasps. Pyrethrin-based sprays are readily available and offer a fast-acting solution to pest problems, ensuring your garden remains a tranquil haven.

For those seeking a versatile, organic solution, look no further than diatomaceous earth. This natural powder is made from the fossilized remains of tiny aquatic organisms called diatoms. When insects come into contact with diatomaceous earth, it absorbs the oils and fats from their exoskeletons, causing them to dehydrate and die. This safe and effective insecticide is perfect for controlling ants, slugs, and fleas. Sprinkle it around your garden and say goodbye to these unwanted guests.

Crafting your very own insecticidal soap is an excellent, natural way to combat soft-bodied insects like aphids, mites, and scales. This simple solution is made by mixing a mild liquid soap with water. The soap penetrates the insect’s outer shell, causing dehydration and death. Regularly spraying your plants with this gentle yet effective remedy will provide ongoing protection, allowing your garden to flourish.

Introducing beneficial insects into your garden is a brilliant natural strategy. Ladybugs, lacewings, and parasitic wasps are nature’s pest controllers. They prey on common garden pests like aphids, caterpillars, and scale insects. You can purchase these beneficial insects online or attract them by planting specific flowers they love, such as marigolds, sunflowers, and dill. This eco-friendly approach helps restore the natural balance in your garden.

With these natural insecticides in your gardening toolkit, you can confidently protect your green oasis without resorting to harsh chemicals. Whether you’re battling aphids, beetles, or mosquitoes, these solutions offer effective and sustainable pest management. Remember, a healthy garden is a diverse ecosystem, and by working with nature, you can achieve a thriving and vibrant outdoor space. Happy gardening!

Top 10 Secrets to Growing the Biggest, Healthiest Spider Plants

Are you ready to become a spider plant parent? These lush, leafy plants are not only a beautiful addition to your indoor garden but are also incredibly easy to care for and propagate. With their graceful arching leaves and vibrant green hues, spider plants (Chlorophytum comosum) are a popular choice for both seasoned and novice gardeners. But, if you’re aiming to cultivate the biggest, healthiest spider plants that will become the envy of your plant-loving friends, there are a few secrets you’ll want to know. Get ready to unlock the full potential of your spider plant journey!

1. **Choose the Right Variety**: Spider plants come in various cultivars, but for lush growth, consider the ‘Bonnie’ or ‘White Bonnie’ varieties. These cultivars are known for their robust and vigorous growth, making them excellent choices for those seeking impressive spider plants.

2. **Provide Ample Light**: Adequate sunlight is crucial for spider plant health. Place your plant near a bright window with indirect sunlight. East- or north-facing windows are ideal, providing a gentle morning sun that won’t scorch the leaves. If natural light is limited, consider supplementing with artificial grow lights to ensure your plant gets the light it needs.

3. **Water with Care**: Overwatering is a common mistake with spider plants. Allow the top inch of soil to dry out between waterings. Spider plants prefer a good soak followed by a period of drying, mimicking their natural environment. During winter, reduce watering as the plant’s growth slows down. Use room-temperature water to avoid shocking the roots.

4. **Humidity and Temperature**: Spider plants thrive in average room humidity but appreciate a bit of extra moisture. Misting the leaves occasionally or placing the plant on a tray with water and pebbles can help increase humidity. Maintain a comfortable room temperature between 60°F and 75°F (15°C-24°C) for optimal growth.

5. **Fertilize Regularly**: Feeding your spider plant regularly will encourage healthy growth. Use a balanced liquid fertilizer diluted to half strength every two weeks during the growing season (spring and summer). Reduce fertilization during the winter months when the plant’s growth slows.

6. **Pruning and Propagation**: Pruning not only keeps your spider plant looking neat but also stimulates growth. Remove older, discolored leaves and any plantlets (spiderettes) to redirect energy towards the main plant. You can easily propagate these plantlets in water or soil, expanding your spider plant collection.

7. **Repotting for Growth**: Spider plants are generally happy to be slightly root-bound, but if you notice roots emerging from the drainage holes, it’s time to repot. Choose a slightly larger pot with good drainage and a well-draining potting mix. Repotting every 2-3 years will provide fresh nutrients and prevent the plant from becoming stressed.

8. **Pest and Problem Management**: Spider plants are relatively low-maintenance and tend to stay healthy if their basic needs are met. Watch out for common pests like spider mites and mealybugs. Regularly inspect your plant, and if pests are detected, isolate the plant and treat it with organic pest control solutions. Proper care and maintenance will help prevent most problems.

Never Place Your Snake Plants in These 5 Spots if You Don’t Want to Kill Them

Do you have a green thumb? If not, you might be unintentionally harming your precious snake plants. Many plant enthusiasts choose snake plants as their first foray into the world of houseplants due to their low maintenance nature and ability to thrive in various conditions. However, even these hardy plants have their limits, and placing them in certain spots could be detrimental to their health. Here are five places you should never keep your snake plants.

**1. Dark Corners**
One of the biggest misconceptions about snake plants is that they can survive in complete darkness. While they can tolerate low light conditions, they still need some form of light to photosynthesize and grow. If you place your snake plant in a dark corner, it will slowly weaken and eventually die. These plants are native to West Africa and are used to bright, indirect light. Ideally, place your snake plant near a window with filtered sunlight or a sheer curtain, ensuring it gets the right amount of light to thrive.

**2. Cold, Drafty Areas**
Snake plants are not fans of the cold. They are sensitive to temperatures below 50°F (10°C) and should never be placed in drafty locations like near an air conditioner or an exterior door. Extreme cold can cause their leaves to turn soft and mushy, and the plant may eventually die. If you live in a colder climate, consider placing your snake plant in a sunny spot away from drafts. During winter, you might need to provide additional warmth, such as a nearby space heater (just ensure it’s not too close to the plant to prevent overheating).

**3. Overly Bright, Sunny Windowsills**
While snake plants enjoy bright, indirect light, direct sunlight can be harmful, especially for extended periods. Placing your snake plant on a windowsill that receives intense, direct sunlight, especially during the summer months, can result in scorched leaves. These plants are adapted to the dappled light of the forest floor, so bright, indirect light is ideal. If you have a sunny window, consider adding a sheer curtain to filter the light or placing the plant a few feet away from the window.

The next two spots to avoid can be found in the continuation of this article below, offering a comprehensive guide to keeping your snake plant healthy and thriving. Stay tuned for more plant care insights that will turn your thumb greener than you ever thought possible!

Top Companion Planting Pairs For a Thriving Garden

Companion planting is a clever strategy employed by gardeners to create a harmonious and productive garden ecosystem. By pairing certain plants together, you can naturally enhance growth, deter pests, and even improve flavors. Let’s explore some of the best companion planting combinations that will transform your garden into a thriving haven.

**Tomatoes and Basil:** Imagine harvesting juicy tomatoes brimming with flavor. Planting basil alongside tomatoes is a match made in culinary heaven. Basil not only enhances the taste of tomatoes but also repels common pests like mosquitoes and flies. Plus, the lush green foliage of basil provides a beautiful contrast to the vibrant red tomatoes, adding a touch of aesthetic appeal to your vegetable patch.

**Carrots and Onions:** For a dynamic duo beneath the soil, consider planting carrots and onions together. Carrots thrive in the presence of onions as they emit a scent that deters pests like carrot flies. In return, carrots loosen the soil, making it easier for onions to grow. This underground partnership ensures healthier root development for both vegetables. Just be sure to harvest your carrots before the onions mature to avoid any competition for space.

**Beans and Marigolds:** Marigolds are a gardener’s secret weapon. When planted alongside beans, these vibrant flowers repel a variety of pests and even attract beneficial insects like ladybugs and lacewings. Beans, being nitrogen fixers, contribute to the overall health of the soil, making them the perfect companion for nitrogen-loving plants like marigolds. Together, they create a vibrant and pest-free environment.

**Cucumbers and Sunflowers:** Imagine a garden scene with tall sunflowers reaching for the sky while cucumber vines intertwine beneath them. This iconic pairing offers multiple benefits. Sunflowers provide natural support for cucumber plants to climb, saving space in your garden. Additionally, sunflowers attract pollinators, which can increase cucumber yield. The large leaves of sunflowers also offer shade, keeping the soil cool and moist, which is ideal for cucumber growth.

Companion planting is an art that can transform your garden into a vibrant and thriving ecosystem. By understanding these harmonious plant partnerships, you can create a garden that is not only productive but also visually stunning. Stay tuned for more gardening tips and tricks to elevate your green thumb game!

Trick to Make Your Peace Lily Grow Unstoppably (And What Sellers Won’t Tell You)

Are you a plant enthusiast looking for the perfect houseplant that’s easy to care for and adds a touch of greenery to your space? Look no further than the Peace Lily! With its elegant white flowers and lush green foliage, this tropical beauty is not just eye-catching but also incredibly resilient. But here’s the catch—there’s a little-known trick to make your Peace Lily flourish, and it’s not something plant sellers often reveal. So, let’s dive into the secrets of nurturing this plant and creating the perfect environment for its unstoppable growth.

The Peace Lily, scientifically known as Spathiphyllum, is a tropical plant native to the rainforests of Central and South America. Its ability to thrive in low light conditions and purify indoor air makes it an extremely popular houseplant. However, many plant lovers often find themselves wondering why their Peace Lily isn’t blooming or growing as expected. The answer lies in understanding the plant’s natural habitat and replicating those conditions.

To unlock the full potential of your Peace Lily’s growth, the key is to mimic its tropical rainforest environment. These plants thrive in warm and humid conditions with indirect sunlight. While they can tolerate low light, they will grow faster and bloom more frequently with brighter, indirect light. Imagine the dappled sunlight filtering through the canopy in a rainforest—that’s the ideal lighting condition for your Peace Lily.

Now, here’s the secret weapon: a simple trick to increase humidity around your plant. Place your Peace Lily on a tray filled with gravel or pebbles and water. As the water evaporates, it will create a humid microclimate that your plant will love. Just ensure the plant’s roots aren’t sitting in water to prevent root rot. Regular misting of the leaves can also help maintain humidity and keep the foliage clean and dust-free.

When it comes to watering, the Peace Lily prefers a good soak followed by a period of slight dryness. A thorough watering once a week is usually sufficient, but always check the top inch of soil before watering. The soil should be kept moist but never soggy. Overwatering is a common mistake, so it’s better to underwater than risk root rot.

Fertilizing your Peace Lily every month during the growing season with a balanced houseplant fertilizer will provide the necessary nutrients. Repotting should be done every two years or when you notice roots poking out of the drainage holes.