The Best Indoor Plants for Every Room of Your Home

Are you a plant parent looking to bring some greenery into your home but feeling overwhelmed by the vast array of options available? Well, get ready to embrace your inner green thumb, because we’ve put together a comprehensive guide to help you choose the perfect indoor plants for every room in your home. Say goodbye to boring, lifeless spaces and hello to a vibrant, thriving indoor oasis!

When it comes to adding greenery to your living room, you want plants that make a statement. Fiddle-leaf figs are the ultimate choice for those seeking a bold, architectural look. Their large, glossy leaves and distinctive shape will undoubtedly become a conversation starter. If you prefer something a little more whimsical, opt for a hanging spider plant. These beauties not only add texture to your space but also boast excellent air-purifying qualities. Plus, their cascading foliage makes them an eye-catching addition to any corner of the room. For a touch of elegance, consider a Peace Lily. Its glossy, dark green leaves and delicate white flowers bring a sense of tranquility and can even thrive in low-light conditions.

In the kitchen, it’s essential to choose plants that can handle varying levels of humidity and temperature changes. Herbs like basil, rosemary, and thyme make practical and aromatic additions to your countertop garden. Not only do they add a fresh touch to your cooking, but they also thrive in the warm and slightly humid environment of a kitchen. For a pop of color, try a colorful cactus or succulent arrangement. These low-maintenance plants can handle neglect and still look stunning on a sunny windowsill, adding a touch of desert charm to your culinary haven.

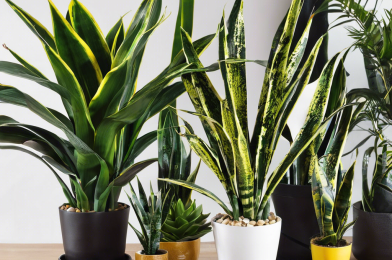
As you retreat to your bedroom sanctuary, create a relaxing atmosphere with plants that promote better sleep and well-being. Snake plants are excellent for the bedroom as they release oxygen at night, improving air quality while you slumber. Their upright, sword-like leaves come in various patterns, adding a touch of natural decor to your bedside table. For a touch of elegance, orchids are a perfect choice. These delicate flowers thrive in indirect sunlight and add a pop of color and sophistication to your bedroom.

When it comes to bathroom plants, moisture-loving varieties will thrive in this humid environment. Boston ferns are a top pick, with their lush fronds adding a tropical vibe to your shower or tub area. Another great option is the Peace Lily, which not only adds beauty but also helps purify the air, making your bathroom feel like a spa-like retreat.

Whether you’re an experienced plant parent or just starting your botanical journey, there’s a perfect plant for every room in your home. So go ahead, add some greenery, and watch your living spaces bloom with life!

How to Create a Low-Maintenance Garden That Thrives

# Creating a Low-Maintenance Garden: Simple Tips for a Flourishing Outdoor Space

Are you dreaming of a beautiful garden but cringe at the thought of high maintenance and endless chores? Fear not; achieving a thriving and visually appealing garden with minimal effort is entirely possible! By making thoughtful choices in plant selection, design, and maintenance routines, you can create an outdoor oasis that requires less time and effort while still looking fantastic. Let’s explore some practical steps to guide you in this gardening journey.

Creating a low-maintenance garden begins with understanding your local climate and soil conditions. Choose plants that are well-adapted to your region, as they will naturally require less care. Native plants are often an excellent choice since they have evolved to thrive in your specific environment, requiring minimal intervention. Perennials, such as lavender, peonies, and daylilies, offer a continuous display of beauty year after year without the need for replanting. Ground covers like creeping thyme and chamomile not only suppress weeds but also contribute to a lush, carpet-like appearance with minimal mowing.

In designing your garden, consider arranging plants in beds or clusters rather than scattering them individually. This approach creates a sense of cohesion and reduces the amount of weeding and trimming required. Focus on creating defined borders and pathways to prevent plants from encroaching on areas that demand regular maintenance. Mulching these beds will help retain moisture, suppress weeds, and provide a neat and tidy appearance.

Efficient watering practices are key to keeping your garden low-maintenance. Instead of daily manual watering, consider investing in a drip irrigation system that delivers water directly to the roots, minimizing evaporation and promoting deep root growth. This method reduces water waste and the time spent tending to thirsty plants. Grouping plants with similar water needs together will further streamline your watering routine.

Moreover, embrace the concept of ‘right plant, right place’ to minimize maintenance. Place shade-loving plants in areas naturally shaded by your home or trees, and position sun-loving varieties in spots with maximum sunlight exposure. This simple strategy reduces the need for additional shading or sunlight manipulation.

How to Grow a Beautiful Garden on a Budget

# Growing a Gorgeous Garden Without Breaking the Bank

Creating a stunning garden need not be an expensive endeavor. With a bit of creativity, planning, and some savvy shopping, you can transform your outdoor space into a thriving oasis without straining your wallet. Here’s a comprehensive guide to help you cultivate your dream garden while keeping costs under control.

**Start with a Plan:** Before heading to the nursery, take time to plan your garden. Decide on a theme, whether it’s a vibrant flower garden, a tranquil herb garden, or a productive vegetable patch. Consider your local climate and choose plants that thrive in your region to reduce the need for excessive maintenance. Sketch out your garden layout, taking into account the mature sizes of the plants to avoid overcrowding. Proper planning ensures you buy only what you need, minimizing impulse purchases that can blow your budget.

**Seeds vs. Seedlings:** Growing plants from seeds is an incredibly cost-effective way to fill your garden. Seeds are generally cheaper than buying established plants, and the variety available is astonishing. Start seeds indoors in trays or recycled containers, providing them with warmth and light. As they grow, transplant the seedlings into larger pots until they are ready to be moved outdoors. This process not only saves money but also offers the joy of nurturing life from its earliest stages.

**Shop Smart for Plants:** When purchasing plants, look for local nurseries and garden centers that often offer better prices and healthier stock than big-box stores. Consider buying plants in smaller sizes, as they typically cost less and will quickly catch up given the right care. Keep an eye out for end-of-season sales when retailers clear stock to make way for new items. Buying plants in late summer or early fall can provide great bargains. Perennials, in particular, can often be divided and shared with fellow gardeners, further reducing costs.

**Embrace DIY:** Creating your own compost is a budget-friendly way to enrich your soil and reduce waste. Collect kitchen scraps, yard trimmings, and leaves to create a nutrient-rich compost pile. You can also make your own organic pest control solutions and fertilizers using household ingredients, saving money on store-bought alternatives.

(Continued below…)

How to Make a Very Cheap Bee Waterer

Creating a bee waterer is a simple and cost-effective way to support your local bee population. Bees, just like all living creatures, need access to clean water, especially during the hot summer months. By providing them with a dedicated water source, you can help these essential pollinators thrive and, as a bonus, attract more bees to your garden. Here’s a step-by-step guide to making a bee waterer on a budget.

Gather the Supplies: The great news is that making a bee waterer requires only a few basic and affordable items. You’ll need a shallow container, such as a pie tin or a plastic lid from a large container. Make sure it’s clean and free from any chemicals. You should also have some marbles, pebbles, or small rocks on hand. These will serve as the landing pads for the bees, ensuring they have a safe space to rest while drinking.

Assembly: Place your chosen shallow container in a location that is easily accessible to bees but not in direct sunlight, as this can cause the water to evaporate quickly. Fill the container with the marbles or pebbles, ensuring they are evenly distributed and stable. Now, carefully pour water into the container, making sure the water level is just below the top of the marbles.

Why Marbles or Pebbles? Bees are excellent at finding water sources, but they need a safe place to land and drink without drowning. The marbles or pebbles provide the perfect solution by creating a surface area for the bees to rest. This way, they can drink their fill without any risk.

Maintenance: It’s important to keep the water clean and refreshed regularly. Stagnant water can become a breeding ground for mosquitoes and other pests. Change the water every few days, ensuring the marbles or pebbles are cleaned too. This simple maintenance routine will ensure your bee waterer remains a healthy and welcoming spot for the bees.

Enhancing the Experience: To make your bee waterer even more attractive to bees, consider adding a few colorful, non-toxic silk flowers or floating a slice of orange or lemon in the water. These additions provide visual cues for the bees, encouraging them to investigate the water source.

Impact on Bee Population: Bees play a crucial role in our ecosystem, particularly in pollinating plants and crops. By providing them with a dedicated water source, you are contributing to the health and vitality of the bee population in your area. This simple act of kindness can have a significant positive impact on the environment.

Community Effort: Encourage your neighbors and local community to create bee waterers too. This will ensure that bees have multiple water sources throughout the neighborhood, increasing their chances of survival and thriving.

In conclusion, making a very cheap bee waterer is a simple and rewarding task. By following these steps, you can contribute to the well-being of bees and, in turn, support a healthy environment. So, get creative with your DIY skills and give these beneficial insects a helping hand!

Stop Watering Your Peace Lily Wrong. Here is The Right Way You Should Follow.

The peace lily, with its elegant white flowers and lush green foliage, is a popular houseplant cherished for its beauty and air-purifying abilities. However, many plant enthusiasts struggle to keep their peace lilies thriving due to incorrect watering practices. Overwatering and underwatering are common issues, often leading to yellowing leaves, root rot, or a lack of flowering. To ensure the health and vitality of your peace lily, it’s crucial to understand the right watering technique. In this article, we will reveal the proper way to water your peace lily, helping it flourish in your home or office.

Understanding the unique water requirements of peace lilies is essential. These plants, native to tropical regions, prefer consistently moist soil but not waterlogged conditions. A common misconception is that they need frequent watering, which often results in overwatering. Instead, a balanced approach is necessary to create an environment that mimics their natural habitat.
Span

The first step in watering your peace lily correctly is to assess the moisture level of the soil. Stick your finger about an inch deep into the soil; if it feels dry at this depth, it’s time to water. Alternatively, you can use a moisture meter for a more precise reading. Overwatering is a common mistake, so be sure to check the soil moisture regularly to avoid this pitfall.

When it’s time to water, use room-temperature water and pour it slowly around the base of the plant, allowing it to penetrate the soil thoroughly. Avoid wetting the leaves, as this can lead to fungal diseases. It’s crucial to water deeply, ensuring that the entire root system is adequately hydrated. Drain any excess water from the saucer beneath the pot to prevent the roots from sitting in water, which can cause root rot.

The frequency of watering depends on various factors, such as humidity, temperature, and the size of the plant. Peace lilies generally prefer slightly drier conditions during the winter months, so you may need to adjust your watering schedule accordingly. As a general rule, water your peace lily when the top inch of soil feels dry, ensuring that the soil remains consistently moist but not soggy.

To further enhance the health of your peace lily, consider using filtered or distilled water, as chemicals in tap water can sometimes build up in the soil over time. Additionally, repotting your peace lily every one to two years will provide it with fresh soil and room to grow, promoting overall plant health.

Proper watering is essential for the well-being of your peace lily. By following these simple steps, you can ensure that your peace lily thrives, rewarding you with its stunning blooms and air-purifying benefits. Remember, the key to success with peace lilies is maintaining a balance—not too wet, not too dry, but just right.

Why Epsom Salt Is a Gardener’s Best Friend?

Many gardeners swear by Epsom salt as a secret weapon for a thriving garden, and for good reason. Epsom salt, despite its name, is not actually salt but a natural mineral compound composed of magnesium and sulfate. These essential minerals offer a host of benefits for plants, making it a versatile and eco-friendly addition to your gardening toolkit. Whether you’re an experienced green thumb or just starting your gardening journey, understanding the advantages of Epsom salt can help you cultivate a healthier and more vibrant garden.

One of the primary roles of Epsom salt in gardening is its ability to enhance plant growth and overall health. Magnesium, a key component of the salt, plays a crucial part in chlorophyll production, the pigment that gives plants their green color and enables photosynthesis. By providing plants with an extra magnesium boost, Epsom salt encourages robust growth, greener foliage, and improved overall vitality. This is particularly beneficial for plants showing signs of magnesium deficiency, such as yellowing leaves or stunted growth.

This natural remedy also aids in promoting root development and strengthening the overall structure of plants. When dissolved in water, Epsom salt can be used as a soil amendment or a foliar spray. Its magnesium content helps in the uptake of other essential nutrients, fostering a healthier root system. This, in turn, leads to better nutrient absorption and a stronger foundation for plants, enabling them to withstand environmental stressors and produce more vibrant blooms or abundant harvests.

Moreover, Epsom salt can help alleviate common garden pests and plant ailments. For instance, sprinkling Epsom salt around the base of plants may deter slugs and snails, which can wreak havoc on your garden. It can also serve as a natural remedy for various plant diseases. When mixed with water and sprayed on plants, it can combat issues like leaf curling, blossom rot, and nutrient deficiencies, helping to keep your garden thriving.

For those cultivating a beautiful rose garden or other flowering plants, Epsom salt can be a real game-changer. It promotes more significant blooms and richer colors in flowering plants. By sprinkling some Epsom salt around the base of rose bushes or other flower beds and watering it in, you’ll encourage more substantial root systems and healthier canes, resulting in more abundant blooms.

In the world of gardening, Epsom salt is a versatile and eco-friendly solution for various challenges. From enhancing plant growth and health to deterring pests and diseases, this natural mineral compound offers a multitude of benefits. By incorporating Epsom salt into your gardening routine, you’ll be well on your way to cultivating a thriving, vibrant, and healthy garden that will be the envy of your neighborhood. So, roll up your sleeves, grab some Epsom salt, and get ready to transform your green space into a flourishing oasis.

These Are 10 Common Mistakes That Make Your Aloe Vera Plants Die

Many plant enthusiasts love aloe vera for its low maintenance and numerous benefits, but even the hardiest plants can suffer if they don’t receive the proper care. Aloe vera is a succulent plant native to arid regions, and while it has adapted to survive in dry conditions, several factors can lead to its demise. Here are 10 common mistakes to avoid to ensure your aloe vera plant thrives.

1. Overwatering: One of the most common ways to kill an aloe vera plant is by overwatering. These plants have adapted to survive with minimal water, and their succulent leaves can store moisture for drier times. Overwatering can lead to root rot, a condition where the roots suffocate and die due to excess moisture. Always let the soil dry out between waterings. Stick your finger about an inch into the soil; if it feels moist, hold off on watering for a few more days.

2. Poor Drainage: Aloe vera plants need well-drained soil to prevent waterlogging. Use a pot with drainage holes to ensure excess water can escape. Heavy, clay-based soils retain water and should be avoided. Instead, opt for a sandy or cactus-specific potting mix that promotes good drainage.

3. Inadequate Sunlight: Aloe vera plants thrive in bright, indirect sunlight. While they can tolerate some direct sunlight, especially in the morning, intense, direct sun, especially during the hottest parts of the day, can scorch their leaves. Find a spot near a sunny window where your plant can receive ample light without getting too hot. If natural light is limited, consider using grow lights to provide the necessary illumination.

4. Extreme Temperatures: Aloe vera plants are sensitive to extreme temperatures. They prefer room temperature conditions, between 55°F and 85°F (13°C to 29°C). Keep them away from drafty windows, heating vents, and air conditioning units. Sudden temperature fluctuations can cause stress and lead to leaf damage.

5. Using the Wrong Pot Size: Choosing the right pot size is crucial for aloe vera plants. A pot that’s too large can retain excess moisture, leading to overwatering issues. On the other hand, a pot that’s too small can restrict root growth. Select a pot that allows for at least one inch of space between the plant’s base and the pot’s edge, providing room for root expansion without excess moisture retention.

6. Pest Infestations: Pests like mealybugs and spider mites can attack aloe vera plants, especially when they are stressed. These pests can weaken the plant and cause discoloration and deformation of the leaves. Inspect your plant regularly for signs of pests and treat any infestations promptly with natural pesticides or insecticidal soaps.

7. Neglecting Fertilization: While aloe vera plants don’t require frequent fertilization, they benefit from occasional feeding during the growing season (spring and summer). Use a balanced, water-soluble fertilizer diluted to half the recommended strength. Over-fertilization can burn the roots, so it’s essential to follow the instructions carefully.

8. Ignoring Leaf Care: The leaves of an aloe vera plant can accumulate dust and debris, clogging their pores and hindering their ability to photosynthesize efficiently. Wipe the leaves gently with a damp cloth every few weeks to remove any buildup and keep them clean.

By avoiding these common mistakes, you can ensure your aloe vera plant remains healthy and vibrant. Remember, the key to success with aloe vera is to mimic its natural environment and provide it with the right balance of light, water, and care.

Is Fleabane the Secret to Better Health You’ve Been Overlooking?

Fleabane, a flowering plant often considered a humble weed, might just be the secret ingredient to improving your overall health. While it may not have the glamourous appeal of trendy superfoods, its potential health benefits are certainly worth exploring. Could this overlooked plant be the key to unlocking a healthier you?

Fleabane is a perennial herb found in various regions across the globe, including North America, Europe, and Asia. Historically, it has been used in traditional medicine for its potential therapeutic properties. The plant contains a range of bioactive compounds, including flavonoids and phenolic acids, which are known for their antioxidant and anti-inflammatory effects.
#
One of the most intriguing aspects of Fleabane is its potential as a powerful antioxidant. Antioxidants play a crucial role in protecting our bodies from oxidative stress, which is caused by an imbalance of free radicals and can lead to various health issues. The flavonoids and phenolic acids in Fleabane have been studied for their ability to scavenge free radicals, potentially reducing the risk of chronic diseases associated with oxidative stress, such as heart disease and certain types of cancer. Incorporating Fleabane into your diet may contribute to a robust antioxidant defense system.
#
Beyond its antioxidant properties, Fleabane has also been traditionally used to support respiratory health. The plant contains mucilage, a substance that can help soothe and protect irritated mucous membranes in the respiratory tract. This makes Fleabane a natural remedy for coughs, bronchitis, and other respiratory ailments. Additionally, its anti-inflammatory properties may contribute to reducing inflammation in the airways, providing further relief.
#
But how can you incorporate Fleabane into your daily routine? One simple way is through tea. Fleabane tea is easy to prepare by infusing the dried leaves and flowers in hot water. This soothing beverage not only provides the potential health benefits of the plant but also offers a calming and pleasant drinking experience. For those with a sweet tooth, a touch of honey can be added, enhancing both the taste and the potential therapeutic effects, as honey also has renowned health properties.
#
Fleabane’s versatility extends beyond tea. The young leaves and shoots can be added to salads, providing a nutritious and slightly bitter kick to your greens. Moreover, the plant can be incorporated into smoothies and juices, adding a unique twist to your daily beverage routine. For the adventurous cook, Fleabane can be used in cooking, providing a subtle earthy flavor to soups, stews, and even baked goods.
#
While Fleabane shows promise in promoting better health, it’s important to remember that it should not replace professional medical advice or treatment. However, as a complementary approach to wellness, Fleabane can be a valuable addition to your diet. Its potential as an antioxidant powerhouse, respiratory aid, and versatile culinary ingredient make it an intriguing plant to explore.
#
So, next time you come across this unassuming weed, consider giving it a second glance. Fleabane just might be the secret to better health that you’ve been overlooking all this time. From teas to culinary experiments, incorporating Fleabane into your daily life could be an exciting and beneficial journey towards wellness.
#
As with any natural remedy, it is always recommended to consult with a healthcare professional before making significant changes to your diet or health routine, especially if you have any pre-existing health conditions or are taking medications.

15 Must-Know Things For Snake Plant Owners

Have you ever thought of adding a touch of greenery to your indoor space with a plant that’s not just visually appealing but also incredibly low-maintenance? Look no further than the snake plant, a tropical plant native to West Africa. Here are 15 essential tips to help you become a successful snake plant owner, ensuring your leafy friend thrives in your home or office.

**1. Snake Plant Varieties:** Snake plants boast an impressive array of varieties, offering something for every plant enthusiast. From the classic ‘Laurentii’ with its yellow-edged leaves to the strikingly tall ‘Twisted Sister’ and the variegated ‘White Bird,’ each variety adds a unique aesthetic to your collection. These plants are renowned for their upright growth, sharp leaves, and durability, making them ideal for indoor environments.

**2. Lighting Preferences:** One of the reasons snake plants are so popular is their adaptability to various lighting conditions. While they prefer bright, indirect sunlight, they can handle a range of light levels, from low light to partial shade. This makes them perfect for rooms with limited natural light, such as offices or bathrooms, as they will still thrive and add a touch of nature to these spaces.

**3. Watering Techniques:** When it comes to watering, snake plants prefer a ‘less is more’ approach. These plants are highly drought-tolerant, so it’s best to let the soil dry out between waterings. Overwatering is a common mistake that can lead to root rot, so be sure to water sparingly, especially during the winter months when the plant’s growth slows down. Always check the moisture level of the soil before watering to avoid any issues.
“Allowing the soil to dry out between waterings is essential for the health of your snake plant, as it helps prevent root rot and other moisture-related problems.”

**4. Soil and Potting:** Well-draining soil is crucial for snake plants to avoid waterlogging and root damage. A mix of regular potting soil and perlite or sand is ideal, ensuring proper drainage. When repotting, choose a pot with drainage holes and one that is only slightly larger than the current root ball. This prevents over-potting and helps maintain the plant’s compact growth habit.

**5. Temperature and Humidity:** Snake plants are native to tropical regions, but they can adapt to a wide range of temperatures, making them ideal for most indoor environments. They prefer temperatures between 60°F and 85°F (15°C and 29°C) and can handle normal household humidity levels. However, be cautious of cold drafts and sudden temperature drops, as these can cause stress to your plant.

The snake plant’s versatility, ease of care, and striking appearance make it a favorite among plant enthusiasts. Stay tuned for more tips on snake plant care and learn how to keep your indoor garden thriving!

10 Common Mistakes People Think Are Correct When Caring for Christmas Cactus

Many plant enthusiasts adore the Christmas cactus for its vibrant blooms and easy-going nature, especially during the holiday season. However, this beloved plant can be a bit deceptive, leading well-intentioned caregivers to make mistakes they think are beneficial. Here are 10 common errors people make when caring for their Christmas cactus, believing they’re doing the right thing.

1. Overwatering: One of the most common misconceptions is that a Christmas cactus needs frequent watering, similar to other houseplants. This is a surefire way to drown your plant. This cactus has succulent tendencies and stores water in its leaves. Allow the top inch of soil to dry out before watering, and reduce watering during its dormant period.

2. Ignoring Its Light Preferences: Christmas cacti are not full-sun plants, but they do need bright, indirect light. Placing them in a dark corner may prevent them from blooming. A north-facing window is often an ideal spot, providing just enough light without direct sun exposure.

3. Mistaking Heat Tolerance for Sun Tolerance: Just because your Christmas cactus can handle warm temperatures doesn’t mean it thrives in direct sunlight. Too much direct sun can burn the leaves, causing damage. Keep your cactus in a bright but shaded area to avoid this issue.

4. Overlooking Humidity Needs: These plants enjoy higher humidity levels, especially during the winter when indoor air can be dry. Misting your cactus regularly or placing the pot on a tray of pebbles and water can help increase humidity.

5. Forgetting About Seasonal Care: Christmas cacti are photoperiodic bloomers, meaning they respond to the length of daylight and nighttime darkness. To encourage blooming, ensure they receive 12-14 hours of uninterrupted darkness each night starting in early fall.

6. Neglecting Fertilization: While not as nutrient-hungry as some plants, Christmas cacti still benefit from regular feeding. Use a balanced houseplant fertilizer during the growing season, but avoid over-fertilization, which can lead to excessive growth and weak stems.

7. Pruning at the Wrong Time: Pruning is essential for shaping and encouraging blooms, but timing is crucial. Prune after flowering, removing a few sections of each stem to promote branching. Avoid pruning during the fall when the plant is preparing to bloom.

8. Repotting Too Frequently: Christmas cacti prefer to be slightly root-bound, so repotting should be done sparingly. Only repot when the roots have filled the current container, and choose a pot only slightly larger than the previous one.